It Gives Me Gas - Propane Supply Installation
This is a rather mundane subject but I actually had a bunch of questions and could find no posts or detail online to answer them. I guess everyone thinks it's so obvious and boring that they don't detail it. So I guess this is a public service post.

Worthington 20lb Aluminum Propane Tank
When I got the Boles it had dual steel 20 lb propane tanks with the typical side-by-side tray and hold down arrangement. The tanks were long expired, the regulator arrangement consisted of two separate devices, and the lines were basically straight copper (no flex lines).
My propane needs would be limited: a two-burner cooktop (no stove) and a small 6500 BTU furnace. I'd also have significantly more insulation so the furnace wouldn't need to work so hard. I did some rough calculations and figured a single tank would probably last me a year of the camping I was likely to do.
Looking at a Boles Aero advertisement from the era it looked like they originally used a single tank. Maybe even a 10 lb tank. So I decided to go that route. I also decided to use an aluminum tank since it would look nice polished up, although it was probably not used in that era.

Boles Aero Advertisement from late 1940's
When I was working on the frame I cut off the 2 tank mount that had been welded on before I painted the frame. Underneath the 2-tank mount was a fairly typical set of cross members to support a single tank. There were holes drilled that could be used to bolt a steel tank to the frame at the bottom of the tank (ever wonder why propane tanks have holes on the bottom ring?)
As it turns out the aluminum tank has holes in the bottom support ring, but they didn't line up with the holes in the frame cross members. And I worried about the soft aluminum taking the abuse of a connection to the frame. So I used J-bolt hold downs that seem to be popular in the popup tent world. They are very secure. My only worry is that there is virtually no security and to the tank could be easily stolen.
The Boles had no provisions to mount a regulator, the regulator would just dangle from the lines. You see this in many vintage trailer photos but I wasn't remotely happy with that idea.

Marshall 2-Stage Regulator on Z-mount
I wanted a "clean" installation and decided to mount it on the rail below the tank. Marshall Excelsior sells a popular unit, the MEGR-298, that mounts horizontally with a vent that points down. Better yet, there is a mounting bracket (MEGR-900) available for it that would ease mounting it where I wanted to install it. As will many things during COVID finding the items at a "reasonable" price was a challenge but I prevailed.
I also chose to install the first and second stage covers they offer (MEGR-861 and MEGR-862) although I never got a clear understanding of their absolute necessity even after contacting Marshall (as usual the posts you read are mostly made-up or stories passed down). You don't see the covers on most regulators. Here's what Marshall emailed me:
"The vent cover for regulators used on RVs plays a very important role. The vent hole in the bonnet breathes air in and out above the diaphragm of the regulator. If air is trapped above the diaphragm it would compress and stop the diaphragm from flexing up and either slowing the flow of gas through, or shutting the flow off completely. The regulator vent cover helps prevent road debris, mud, snow, slush and rain from getting inside the regulator through the vent, or even plugging the vent entirely, causing the regulator to malfunction. Hope this helps and always inspect your regulator, regularly."

The other side of the regulator install with the tank feed line

Line from the tank
I ran 3/8" copper tubing which is readily available (but pricy) from Home Depot and other hardware stores. There are different types of copper tubing rated for use as gas lines, hard or soft and different diameters.
By code joints in the gas supply system, ie elbows and T's, should be made outside the trailer. Gas lines use flanged connections in most circumstances. I've read that flanged connections are more robust. From experience I also know they can create installation challenges when space is limited where you want to create a flange.
To protect the lines I ran them so that the frame would absorb any "bottom-out" rubbing first. I supported the copper tubing with readily available P-clamps. They have rubber insulators to reduce metal to metal rubbing. This approach leads to meandering gas lines, but they are functional and hidden. Any place the gas line might possibly rub on a frame member I wrapped it in rubber automotive gas tubing.

Gas line T to cooktop. Note the rubber cover near the frame
Where the gas line needed to enter the trailer I cut a 1" hole through the floor sandwich (aluminum, insulation, plywood, tile). I wrapped the copper line in the rubber automotive fuel line and then sealed the gap with insulation spray foam.
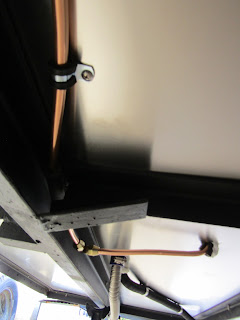
Gas line to Furnace - Image is deceiving - there is plenty of clearance between gas and exhaust

Inside trailer - Supply line to furnace
Once I finished the installation I checked out the lines and connections in the usual fashion: a spray bottle with soap and water mixture. Once you pressurize the system you look for bubbles at the connections. I had tightened all the connectors really well, so I was surprised when I found a few leaks. Further tightening and retesting resolved the leaks.

Now we're cooking with gas!


Comments
Post a Comment