Countertops & cushions
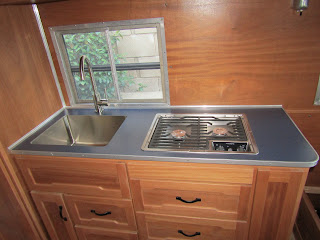
Kitchen Area with Formica Countertop
I considered a lot of different options for the counter and table top but I settled on Formica. Specifically the "Navy Grafix" color. I'd considered some more colorful options and also patterns, but I decided I'll work splashy colors in with the easily replaceable soft goods like throw pillow.

3/4" Baltic Birch counter with components dry fit
Formica countertops are easy enough to install and there are lots of good Youtube videos available. Of course I made some design choices that made it harder than it normally would be. Namely I decided to use and "undermount" stainless steel sink and mount it flush with the top. This means that the sink needs to be recessed and hung from the top rather than attached to the bottom.
I used a router to cut in a recess for the lip of the sink to rest on and glued in the sink. The sink lip needs to be perfectly level with top of the birch plywood. I needed to fill any gap created when I routed the recess and I did that with Bondo then I sanded it smooth.
Normally you use contact cement to bond Formica to the plywood, but this won't work well to adhere the Formica to the lip of the stainless steel sink. You need to use epoxy. This complicates the process of laying down the Formica. Essentially you use contact cement everywhere except on the lip of the sink. You wait for this to set as usual, then you apply slow cure epoxy to the lip of the sink. You then apply the Formica to the plywood.
After the Glue set (I waited a day for the slow cure epoxy), I routed out the holes for the sink and the cooktop. Note that I'd put some painters tape around the inside edge of the sink before I applied the Formica top. This helped prevent scratching from the router bit bearing.

Countertop installed with aluminum edge and corner molding

Table with Formica applied
I made a table for the dinette using the same Formica and 3/4" birch plywood. I used the same aluminum edge banding. The dinette table leg is made to fold so that the table top can be lowered to seat height. This allows the dinette to be configured as either a narrow bed or a sofa.

Dinette table configured as bed/bench

Dinette
I designed the dinette to have seating that could be reconfigured with equal sized wedge back pillows and uniform dimensions along the forward bulkhead so that they could be moved around.
I had the cushions and upholstery done by CushionsXpress.com. The fabric is M10701 Indigo. It feels really nice and complements the counter colors beautifully.

Sofa/lounge
I think we'll likely use the dinette in the sofa/lounge configuration the most. We don't use the dining table in our house much so I doubt we will when we're camping either.


Comments
Post a Comment