It's A Sandwich
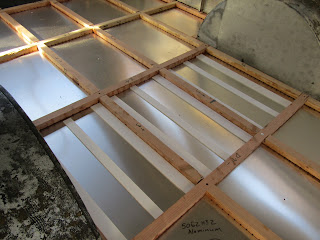
The 5052H32 is fastened to the frame with 1/8" stainless steel closed-end pop rivets spaced around the outside edge about every 12". The closed-end rivet will prevent water from entering through the typical mandrel hole in the pop rivet. There are three 48" wide aluminum sheets laid "east-west" (north being forward) and they overlap by about 3". Where they overlap I used a double bead of Sikaflex 221 sealant-adhesive, then I fastened the sheets together with 1/8" closed-end pop rivets.
Above each frame, on top of the aluminum, I laid down 1 1/8"tall x 1.5" wide kiln dried fir (ripped from 2x4 lumber). The lumber is crossed using half-lap joints. The lumber is attached to the frame using #14 2" stainless steel flat head screws driven into 7/32" holes (my Dewalt driver did this with ease). This is similar to how the original floor was attached to the frame except I used stainless steel screws with Philips head vs a straight screw slot which is a major pain to remove. Also the original lumber spacers were not half-lapped, they simply laid them down.
A few other deviations from the original:
- I added a couple cross members were there was no frame below them. I'll screw these to the plywood flooring and they'll act like battens on a wide wood surface (like a table or bench top). They are strong by themselves but when used in conjuction with the floor they'll add increased stiffness.
- I cantilevered the ends at the front and back by about 2 inches each where the trailer shell bends outward. This provides an additional 4" of floor space. There will be minimal load on these outside edges but every inch counts in a small space like this.
- I made sure to drive a fastener through each lapped joint. Many of them had fasteners to the frame but those that didn't got a #10 stainless steel screw similar to what I'll be attaching the plywood with.
- Provide 1/4" weep holes in strategic locations in the aluminum sheet to allow water to drain out.
- Cover the weep holes with 1mm square stainless steel mesh on the outside where it can be replaced when it inevitably gets clogged or damaged. Some bugs will be able to get through the mesh, but there are other, larger openings.
- Used strips of corrugated plastic ("coreplast") to create an airgap between the aluminum sheet and the rigid foam insulation.
- Dado 1/8" channels in the bottom of the wood cross-members so water and moisture can migrate (hopefully out through the weep holes).
- Seal the wood cross member bottoms with penetrating epoxy where they would com in contact with water.
- Use Extruded Polystyrene (EPS) foam as insulation. It's the closest option to waterproof. The other options, polyisocyanurate (polyiso) and expanded polystyrene (XPS, i.e. Styrofoam), aren't nearly as water resistant. And stuff like fiberglass or rockwool may technically be waterproof, but water will get trapped in the batting. The trade off is EPS has about 20% lower insulation value per thickness that polyiso (but better than XPS). And the cost of EPS is much higher than XPS.
- Use "marine grade" plywood and seal it with penetrating epoxy. Marine grade plywood does not have voids so water can't get trapped internally. And it's constructed with waterproof glue. Unlike exterior grade plywood it is not treated with chemicals that might damage the fastener hardwear. Marine grade plywood is more expensive, particularly if you live in the desert where it's a special order item.


Comments
Post a Comment