A New Axle for Rosie
The new Flexiride axle showed up in 7 days! I ordered it on a Monday during my lunch hour and they fabricated it to my specific dimensions, shipped it to my house and it arrived the following Monday. Unbelievable. I'd read a post on a trailer website and someone else mentioned the same experience, but I thought it was a fluke. I will say that they ask 7-10 days for shipment and then however long shipping takes.
In any case it arrived before I'd successfully removed the old axle. I did get the old axle out after 2 days of futzing around and then used my grinder to remove all the old weld material in preparation for the new installation.
I was curious what the old and new axle weights were so I weighed them. Between the axle and the brakes it looks like Rosie went on a diet of 35-40 lbs.
I positioned the new axle roughly where it needed to go. I marked the centerline of where the spindle needed to be positioned and evened up the side to side distance. These are mostly rough measurements because they are relative to the frame which isn't particularly "true". So I called in the big guns. I asked Elise to help me make the critical measurement: the "triangle". You measure from the tip of the tongue to the tip of each spindle. They need to measure very close or the trailer will be misaligned and "crab" down the road. The instructions don't call out a required precision so I assumed that the tolerance of the mounting brackets (+/- 1/8") was a pretty good indication. We were within about 1/16" and I measured and remeasure as I clamped the axle into place.
Getting the axle positioned
Measuring the triangle
Ready to weld - outside
Ready to weld - inside
I'd made arrangements with my friend John Shillings to weld in the new Flexiride axle when it arrived. John is a recently retired welder and a really nice guy. In truth I asked if he'd make a few small frame repairs and then when he said "yes" I pulled a "bait and switch" and asked if he'd weld in the axle too. It didn't go down exactly like that, but it could have been viewed that way from afar.
John arrived and we remeasured one more time. This time I measured it to be spot on (+/- inside the distance of measure on the tape).
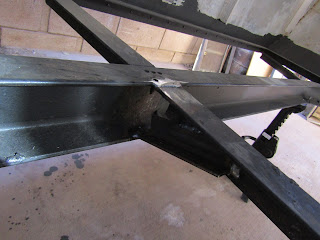
Then John went to work. First he repaired the cracked welds I'd originally asked him to fix. But he also welded in some support gussets that seemed to have been missing. This made that section of the frame really rock solid.
Repaired weld with added support gusset
John Shillings
Then he moved on to the axle.
Welded mounting flange
In reality the "axle" isn't welded to the frame, rather the mounting flanges are welded to the frame and the axle bolts to the flanges. For installation they recommend bolting the flanges to the axle and welding it into position as a unit. The flange setup is great because the axle can be replaced and other manufacturers use the same mounting flange dimensions so you can change manufacturers if you chose.
I thanked John for actually doing the first step in my build-up process. He did excellent work, didn't mind me supervising, answered a bunch of stupid questions, and I can't thank him enough!
After John left I contacted the manufacturer to ask about bolt torque specs and they said there were any specific specs so "get them as tight as you can". That's a tall order for grade 8 bolts. I checked the other vendors specs and they said 120-155 ft*lbs so I torqued the mounting bolts to 135 ft*lbs. Hopefully the axle will stay attached.


Comments
Post a Comment